
What you will learn
How to manage multiple Python deep learning environments (with both Python & GPU dependencies). The constraint: it must be simple and generic (from Linux to Windows), also we don’t want to touch any system wide package while creating a new project.
Why you should read this experience
If you’re like me, you probably spend a few years of struggle because of Cuda dependencies. I realized thanks to my experience that reading code, downloading a project, willing to launching, then being disappointed to get is full of dependencies error is regular and painful.
Anaconda is a very powerful tool; it took me a while to realize how powerful and useful it can be (3 years). I use anaconda mostly to manage my Python environments (without installing Cuda directly in the environment). I evolved on a Linux environment for more than 5 years, so I’m pretty used to its way of working as well as installing system-wide package. Recently I changed work. I was on a big company; I’ve joined the research world to pursue a PhD thesis, in which I had to deal with a new environment: Windows.

For me it changed everything, especially because I’m working on a deep learning project which obviously rely on GPU acceleration and so, in Nvidia Cuda.
Multiple possibilities to manage projects dependencies
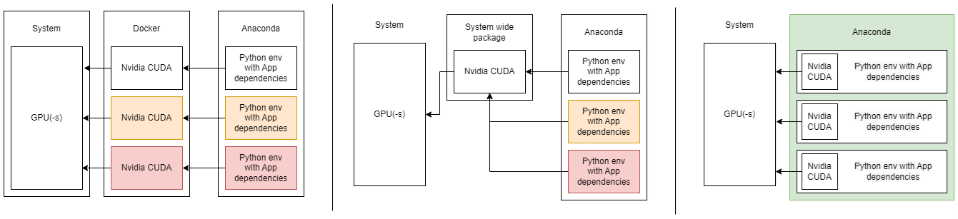
I was looking for a new way to manage my dependencies, willing to, if possible, generalize a new way to manage Cuda over my pro and personal computer. I did study the following solutions: Docker or system-wide package management. Then thanks to my thesis director my problem was solved, I told him about my problem, and he sends me an installation procedure. In it, I discovered Anaconda could manage a full installation. In fact, if you don’t know it, anaconda is able to manage a full deep learning environment, from Cuda to python’s app dependencies.

Here is a schema with multiple way to install multiples environments with Nvidia Cuda:
How to do it?
First create a new conda environment. For this you better try to find an “appropriate” python version (probably the last LTS).
| |
Activate your environment
| |
You’ll need the version of framework you want. Then checkout the version of the Cuda it’s connected to. The Tensorflow & Pytorch version linked with Cuda here:
The trick is here, anaconda can install Cuda & cudnn directly on your environment. Pytorch folks are using it (it’s written in their documentation), my thesis director is using it, thanks to him, I’m using it and I encourage you to do the same.
| |
“-c conda-forge” is the mirror server you’re using to get your versions, if that doesn’t work, just search for the right version on their website and change the mirror.
If you’re creating a new project, please write a clean requirements.txt (A little subtlety that I want to add: rather than freezing the env, write the specific version your using. It’s more generic and simpler to manage over time).
Once you’re prepared to install your projects dependencies, just type the usual:
| |
It will install everything related to libraries etc…
For the Linux folks who miss the command line (or the Windows bros who want to get faster)
It’s not necessary to use Anaconda navigator, you can use a command line to launch your favorite tools. Thanks to “anaconda prompt” on Windows, you can continue to use your tools.
| |
Tada, your environment is clean, simple and these procedure works both on Windows and Linux. Have a great day, I hope this note will help you.